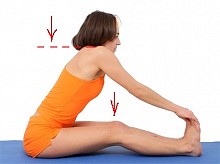
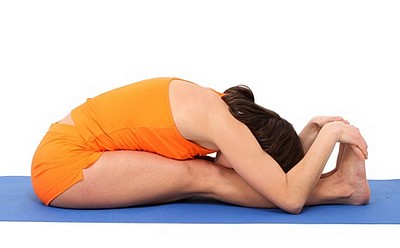
Paschimottanasana is one of my favorite yoga poses, and it is one of the core asanas as well. It can be performed at any level of yoga mastery: beginners can learn it, intermediate yoga students do it, and masters also find many benefits from this pose, especially when one knows key points in its technique.
Paschimottanasana is a Sanskrit name for seated forward bend pose. In Sanskrit “paschima” means “west” or “back”, and “uttana” means “stretching», so it is the pose of back stretching.
Paschimottanasana technique
Sit on the floor with your back up straight. Stretch your legs out in front of you, keeping them close to each other but slightly apart with feet pointed to the ceiling. This is the starting position; make sure you sit on the sit bones and your spine is straight. To enhance this position you can try pulling the flesh from underneath the sit bones towards backside – this can increase the level of stretching and decrease the spine curvature.
Inhale and raise your arms over your head, stretching them towards the ceiling. Look at your palms, lengthening your spine at the same time.
Exhale, bending forward – try bending from the hips, keeping your spine as straight as possible until you will be unable to bend further without curving it. Ideally you bend till grasping your big toes with your hands, wrapping your index, middle fingers and thumbs around the big toes or simply grab the whole feet.

Remember the things to avoid:
- Don’t raise your shoulders;
- Avoid bending the knees – keep your legs straight
If the bending from the hips is too difficult for you, you can try an alternative method: from the starting position, place your palms on the top of the hips, inhale and with exhalation, move your arms over the legs in a sliding movement towards your feet, gently bending forward. This method of doing the seated forward bend pose is easier and suitable for beginners, but not as intense as the described above.
If you can’t reach your toes, try grasping your ankles or place them on the top of the shins – simply find the most comfortable position for you.
Try avoiding too much curving of your spine in its middle. Keep your back as straight as possible, but without too much tension, and bend from the hips.
Once you grasped your toes or shins – this is the final position – hold on, breathing freely and deeply. Try to relax your back muscles, and once you feel the pose became a bit more comfortable, pull your legs more with the help of your arms, increasing the level of stretching in your back and legs. This additional stretching will be possible and effective only when you relax your back and legs.
What is the end position you need to achieve? It is when you place your belly on your thighs, and your head on your legs or on the floor between them, keeping your spine as straight as possible (of course it won’t be possible to have it fully straight, but just as much as possible).

Exiting paschimottanasana
From the final position, exhale, and with inhale lift your head, trying to look at the ceiling above you. Hold it for a second, then with exhale lower your head to the legs, and while inhaling, slowly return to the starting position. You can do it in a couple of ways:
- From the final position, with inhale start raising your arms, your head, and your body at the same time, until you reach the sitting position with your arms stretched out above your head. Then with exhale, lower your arms to the thighs, and relax.
- The easier way is to return to the starting position by slowly sliding your arms over the legs towards the torso until you sit straight with your palms over your things (do this while exhaling).
You can lie down on the floor, on your back, to have a rest for 1-2 minutes, if you need before doing the next asana.
How long to hold paschimottanasana?
When you only learning it, do go for longer than 30 seconds; after a while, you will be able to stay in the pose for 5 minutes and longer. The longer you stay the more benefits from the pose you get.
Paschimottanasana counterposes
For the seated forward bend the best counterpose is a backward bend or a spine twisting pose (such poses are able to relieve the tension of the back muscles after deep bends).
The examples of such counterposes are: purvottanasana, bhujangasana, salabhasana, dhanurasana, matsyasana, setu-asana, ustrasana (backward bends), ardha matsyendrasana, marichyasana (spine twisting poses).
hi, i am (48 years) practicing pashchimotan asana for approx 6 months. i can now grap my toes easily but i would like to touch my forehead to knees. how much time do you think, it would take? the progress is very slow and i am becoming little impatient.
Hello, Sushil,
First of all the age is not a big deal, although a younger person may progress faster due to a younger body.
Technically speaking, 6 months of regular practice is enough to master Paschimottanasana. BUT… you need to do it the right way. So, what to do?
First of all, give up expectations – they will only disturb your mind; better focus on the correct technique and practice regularly (at least three times a weeek).
The second thing is the sequence; yes, you can practice Paschimottanasana alone, without other poses, but it will be way more difficult and longer to master it. Why? Because when you do a sequence of yoga poses, they complement each other, making the whole practice more efficient.
The third thing is that you don’t need to try touching your knees with your forehead; not in the first place, at least. Being able to grab the toes is a good achievement! Try folding at the hips, stretch the hamstrings, don’t round your back too much, and try to relax while doing the Seated Forward Bend Pose – after few months of regular practice along with other poses you will discover that your body has become more flexible and now you can reach your knees with your forehead. But before this happen, you need to make sure that you can place your belly on the hips (or close to them) while keeping the legs straight and holding the toes. This would mean doing the pose properly.
hello i’m satyajeet. I want to know how long paschimottanasana should be.I’m extended my time upto 36 min. Is there any side effect.
Hello, Satyajeet,
According to Krishnamacharya, to achieve the therapeutic effect from Paschimottanasana, one has to remain in it for at least 10 minutes. As for the side effects, you might have some difficulties with elimination sometimes, if you do it wrong. Also this pose reduces Vata dosha and increases Kapha, so if you are Kapha type, don’t hold it for too long.
I am able to touch my leg. But not able to bend further. How long it will take to become perfect pose with flexible body.
Since I am practicing daily
It is different in different people. Usually it takes from several months to a year, but it depends. You should practice other asanas as well to complement and compensate Pascimottanasana.